Creating Luxury Within Small Spaces: High-End Design for Urban Living
-
Posted by
The concept of luxury in home design has undergone a profound transformatio...


DISCLAIMER: The images in this post are for informational purposes to illustrate potential possibilities, recognizing that individual tastes vary. We aim to capture your wants and needs, expanding on each style where possible to offer a range of available options from reputable designers and affiliated brands. This selection process considers a variety of factors to ensure we cater to the diverse preferences of our readers.
Have you been living with an old beat-up, stained coffee table for years now? Perhaps it was a hand-me-down or an impulse buy that no longer meets the standard of the rest of your setup. Either way, it’s time to say goodbye to that worn table and give your living room a new look. You don’t have to replace it, though; with sandpaper, staining, and sealant, you can learn how to refinish a coffee table and give it a whole new lease of life. Refinishing is a budget-friendly DIY approach that costs only a fraction of what you’d pay for a new table. The secret to any successful DIY project is patience and the right tools. Fortunately, this guide will walk you through exactly what you need to revamp your coffee table and bring your living room up to date.

Photo by Juanmataborda from Freepik
Insight – Removing all hardware from the table, such as handles, legs, and drawer fronts, is essential for a smooth and flawless finish. This will make sanding and painting more manageable and prevent accidental damage to the hardware.
The first step is to thoroughly inspect your table to determine what repairs or refinishing it requires. Check for deep scratches, water or heat damage, or structural issues that need fixing before you start sanding. You may need to fill in gouges or cracks, re-glue joints, or replace parts. Make a list of the necessary repairs and factor in time for them. Once any major issues are addressed, wipe down the entire table to remove dirt and debris. Then, start sanding with progressively finer grits of sandpaper (120, 220, 320) until the surface feels smooth. Be sure to sand evenly and in the direction of the wood grain. Plus, vacuum away dust between grits.
After sanding, wipe away remaining dust and grime with tack cloths or damp rags. Apply a wood cleaner or degreaser and scrub any stubborn stains before they get sealed under your new finish. Then, rinse and dry the table thoroughly to avoid water marks. Now, you’re ready to apply your chosen finish. For most DIYers, wiping on polyurethane, lacquer, or Danish oil is a good option. Wipe-on finishes are very forgiving and easy to apply. Brush on at least two to three coats, waiting for each to dry as directed.
Lightly sand between coats with 400-grit paper. Once the final coat is dry, attach felt pads to the bottom of the legs to protect the floors. Then, stand back and admire your handiwork—you brought that old coffee table back to life! With TLC and the proper techniques, refinishing furniture can be very rewarding. Your “new” coffee table will be a centerpiece you can enjoy every day.
Read More: Craft a Custom Piece With Our 19 DIY Coffee Table Design Ideas
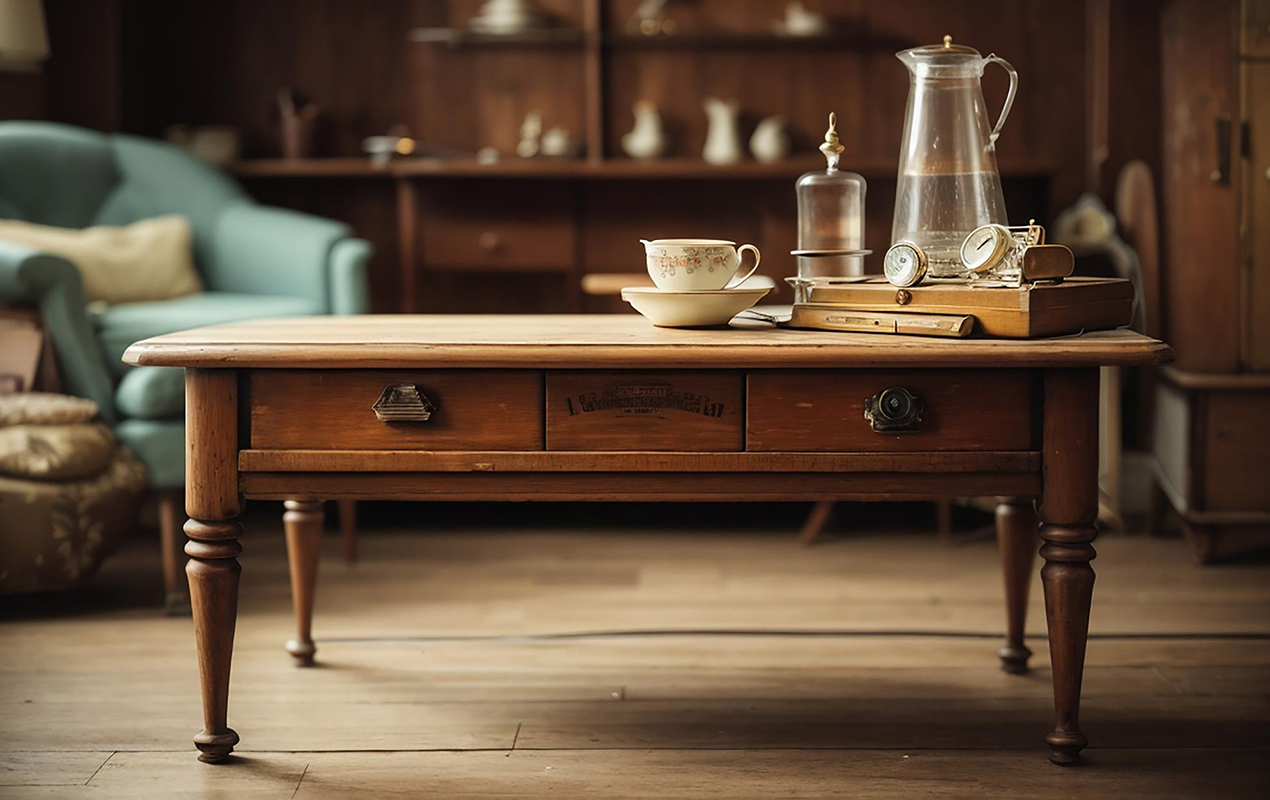
Photo by Dayalguru from Freepik
Insight – Apply two to three thin coats of latex paint to your table for a flawless finish, allowing each coat to dry completely before applying the next. Opt for a light or neutral color that complements your space.
Once you have the table clean, it’s time to sand. This roughs up the surface so the new stain and sealant have something to grip. You’ll want to start with coarser-grit sandpaper, around 120 or 150, to quickly sand off the existing finish. Then, progressively move to finer grits, like 220 and 320, to smooth the surface. Be sure to sand in the direction of the grain. As previously mentioned, wipe away dust with a tack cloth as you go.
For curved edges or corners, you may need to do some spot sanding. Fold the sandpaper in half to fit the shape better. It can also help to wrap the sandpaper around a wood block, piece of cork, or tennis ball. After a final wipe down, ensure the surface is smooth and even by running your hands over the tabletop. If any rough spots exist, hit them again with the fine-grit sandpaper. Once satisfied, you’re ready to stain!

Photo by Pjdesign from Freepik
Insight – Consider applying a wood stain. It’s a simple process that can make a big difference. Remember to work in small sections and wipe off excess stain with a clean cloth. You’ll be amazed at the transformation!
Once you’ve sanded down your table and cleaned it thoroughly, it’s time to choose a stain that will give it a new look. There are many options to consider, from light natural wood tones to rich mahogany shades and beyond. Think about the overall style you want for your space—a lighter, airy stain may suit a beachy coastal room, while a darker walnut could match a traditional den.
Related Article: Accent Your Living Room With 21 Light Wood Coffee Table Ideas
Once you’ve chosen a stain, Apply at least two coats, waiting 15–30 minutes between applications. Wipe away any drips or brush strokes with a rag. Let the table dry completely, at least two to three hours, before handling. Your freshly sanded and stained tabletop should feel silky smooth and ready for a sealant.
Discover More: Adding Warmth & Richness with 18 Dark Wood Coffee Table Ideas
The stain color you select can make a significant impact on your living room. Take your time deciding on a shade that you’ll love. When applying the stain, be patient and work carefully for the best results. With light sanding and a fresh coat of sealant, your refinished table will look like new and be ready to serve you well into the distant future!

Photo by IamMujahidMalik from Freepik
It’s time to seal and protect your newly sanded and stained coffee table. A protective topcoat like polyurethane will shield the wood from water damage, stains, and scratches.
After the stain has dried for at least 24 hours, you’re ready to apply the first coat of polyurethane. Use a high-quality polyurethane that contains UV protectants to prevent fading and yellowing over time. Apply the polyurethane with a brush, wiping away any drips or runs with a cloth. Let the first coat dry as directed, usually three to six hours.
Once the first coat is dry, lightly sand the entire surface with 220-grit sandpaper. Wipe away dust with a tack cloth to ensure the next coat adheres properly. This light sanding, called “de-glossing,” provides a “tooth” for the next coat of polyurethane to grip onto.
Apply at least two to three coats of polyurethane for the best protection, waiting three to six in between. More coats mean better protection, so you can apply up to five or six thin coats if desired. The polyurethane will build up with each coat and create an even, durable finish.
After applying the final coat, let the polyurethane cure for at least three to five days before placing items on the tabletop. The total cure time allows the polyurethane to harden to its maximum strength. Avoid placing hot items like coffee mugs directly on the table for the first few weeks.

Photo by IamMujahidMalik from Freepik
When refinishing a coffee table, it’s easy to make mistakes that could ruin your hard work. Avoid these common pitfalls to get professional-looking results.
Sanding the existing finish provides a “tooth” for the new stain or paint to grip onto. Without sanding, the new finish will quickly peel or chip off. Lightly sand the table with fine-grit sandpaper, wiping away dust with tack cloths as you go.
Test different stains on an inconspicuous area of the table to ensure you get the shade you want before applying it all over. Stain can look very different on the wood sample sheet versus your table. Consider the wood type and desired finish when selecting an oil-based wood stain, gel stain, or paint.
Take your time applying stain or paint in thin, even coats according to the product directions. Let each coat dry as directed before adding another. Rushing the job or applying too thick of a coat can lead to drips, uneven coverage, and longer drying times. Use a high-quality brush to get into grooves and corners.
A sealant like polyurethane helps protect the new finish and gives your coffee table a durable topcoat with a slight sheen. Two to three coats of sealant, lightly sanding between applications, will help prevent water damage, scratches, and stains. Choose a water-based polyurethane for indoor tables.
DIY refinishing projects rarely look professionally sprayed. Accept some imperfections in the finish and appreciate the character it gives your coffee table. With patience and the right techniques, you can achieve excellent results in refinishing furniture at home. Touch up any drips or errors, then sit back and enjoy your “new” coffee table!

Photo by Olanod from Freepik
Insight – Applying one to two additional coats of polyurethane after reattaching all the hardware is highly recommended to ensure maximum protection for your table. This will not only enhance the durability of your table but also keep it looking new.
Congratulations on reaching the end of our roundup! Following our foolproof, step-by-step guide, you can transform your old table into a breathtaking showpiece that will leave your guests in awe. With sandpaper, wood stain, sealant, and elbow grease, you can give your coffee table an entirely new and revitalized look. The project will undoubtedly be a significant undertaking, but you’ll feel proud of your accomplishment. Now, you can sit back, relax, and put your feet up on your newly refinished table. The satisfaction of doing it yourself and saving money in the process makes the experience even more enjoyable. Instead of getting rid of old furniture, consider refinishing it yourself to give it a new look. Who knows, you might even discover a new hobby in the process!